Showing posts with label .NET Development. Show all posts

Friday, July 19, 2013

Stack Imbalance on .NET P/Invoke

The stack imbalance warning when debugging .NET code which used P/Invoke to call DLL function is mostly caused  by wrong parameter calling convention. This post explains in more detail. The default parameter calling convention when using the dllimport attribute is stdcall calling convention, as you can see in this link: http://msdn.microsoft.com/en-us/library/system.runtime.interopservices.dllimportattribute.callingconvention(v=vs.100).aspx. This is the relevant excerpt:
The default value for the CallingConvention field is Winapi, which in turn defaults to StdCall convention.
This caused the stack handling becomes incorrect if you don't set the calling convention in your P/Invoke function declaration. Below is an example on how to do it right.
This is the DLL function declaration in C:
#ifdef __cplusplus
extern "C" {
#endif

__declspec(dllexport) void set_log_filename(char* log_file_path); 

#ifdef __cplusplus
}
#endif
and this is the P/Invoke function declaration in C#:
  DllImport("captcha_solver_dll.dll", CallingConvention = CallingConvention.Cdecl)]
  public static extern void set_log_filename(string log_file_path);
As you can see, I set the set_log_filename() function calling convention to "cdecl" in the C# code above. After this, there is no more stack imbalance warning during debugging.

Tuesday, December 18, 2012

Communicating from Raspberry Pi to ASP .NET MVC 4 Application

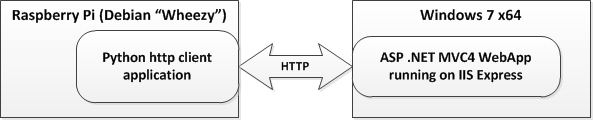
In this post I explain how to communicate with ASP MVC 4 WebApp type of application from Raspberry Pi. The architecture of the entire solution looks like this:


Now, let me start with the application running on Raspberry Pi. This is a very simple http client application that make use of the httplib library in python. It uses HTTP GET to read value from the ASP MVC4 WebApp application. This is the code:
import httplib

conn = httplib.HTTPConnection("192.168.137.1:8080")
conn.request("GET","/api/values/5")
r1 = conn.getresponse()
print r1.status, r1.reason
print r1.read()
As you can see, this application reads the value returned by the ASP MVC4 WebApp application at address http://192.168.137.1:8080/api/values/5. Before I continue explaining the ASP MVC4 portion, let's see the output of this application first when you run it and it gets response from the ASP MVC4 application:


As you can see, the ASP MVC4 application returned the string "value" to the application in the Raspberry Pi.
Now let's move to the ASP MVC 4 application portion. The application is a default application generated when you choose to make WebApp-style application in ASP MVC 4. To do so, create a new project in Visual Studio 2010 or 2012 (I'm using Visual Studio 2010), select Visual C# | Web | ASP .NET MVC 4 Web Application then select Web API. Once your application source code is generated, everything on the server side is actually finished. What's left is configuration to make the ASP application accessible to Raspberry Pi.

There are three steps to make the application accessible through an ethernet connection to the Raspberry Pi.

  1. Configure your application to use IIS Express.
  2. Change IIS Express configuration for your application to "bind" it to the ethernet interface that's connected to Raspberry Pi.
  3. Enable access to your Raspberry Pi through Windows 7 firewall.
The first step is easy, go to Project | [Your Project Name] Properties and select Use Local IIS Web Server, check the Use IIS Express option.
The second step is quite complicated. You need to modify your current windows login account setting for IIS Express. The file is located in C:\Users\[YourLoginName]\Documents\IISExpress\config\applicationhost.config (assuming your Windows 7 user accounts data is in C:\). In the applicationhost.config, go to your application settings in the element(s) inside <site>. In my case this is how it looks like before I made changes:
            
<site name="MvcApplication1" id="2">
    <application path="/" applicationPool="Clr4IntegratedAppPool">
        <virtualDirectory path="/" physicalPath="D:\Experiments\WCF\MvcApplication1\MvcApplication1" />
    </application>
    <bindings>
        <binding protocol="http" bindingInformation="*:2086:localhost" />
    </bindings>
</site>
Now, to make it IIS Express listens on certain network interface, we need to specifically tell it about the binding. This is accomplished by adding new binding in the binding protocol section. This is what I added to that section:
            
<binding protocol="http" bindingInformation="*:8080:192.168.137.1" />
This binds IIS Express to the network interface with IP address 192.168.137.1 at port 8080. The application (MvcApplication1) setting now turns into:
            
<site name="MvcApplication1" id="2">
    <application path="/" applicationPool="Clr4IntegratedAppPool">
        <virtualDirectory path="/" physicalPath="D:\Experiments\WCF\MvcApplication1\MvcApplication1" />
    </application>
    <bindings>
        <binding protocol="http" bindingInformation="*:2086:localhost" />
        <binding protocol="http" bindingInformation="*:8080:192.168.137.1" />
    </bindings>
</site>
Notice the change that happened in the binding protocol section. You can see similar explanation in this link: http://johan.driessen.se/posts/Accessing-an-IIS-Express-site-from-a-remote-computer.

To test whether your IIS Express binding is working, run your application and use your browser to access the page from the ASP MVC4 application. For example, in my case, I use http://192.168.137.1:8080 to see wheter the binding works before I tried to connect from the python application in Raspberry Pi.

The last change to make is to tell the Firewall to accept access from the Raspberry Pi. In my case I made a custom rule in the Firewall (through the firewall configuration in Control Panel) to enable all traffic from the Raspberry Pi IP address to the specific interface I used in my Windows 7 machine. The link above also explains how to manually configure Windows Firewall from Windows command line.
  • The httplib python module exists in both python 2.7.x and 3.x
  • If you want to run http server in Raspberry Pi with python you could use both python 2.7 and 3.2. Just use the SimpleHttpServer module or invoke it with "python -m SimpleHttpServer [port number to listen to]"
  • Last but not least, I have changed my Raspberry Pi IP to static IP before conducting this experiment.
Hopefully this helps ASP .NET MVC 4 folks out there who play with Raspberry Pi.

Tuesday, August 14, 2012

Windows Azure SDK Tools on Windows Server 2008 R2 (x64)

Reading various blogs, books and documentation on Windows Azure development will lead you to the Azure specific tools such as csypack, csencrypt and their friends. However, most of them points to the wrong PATH in your Windows installation as to the location of those Azure specific tools in Azure SDK June 2012. In Azure SDK June 2012 installation on Windows Server 2008 R2 x64, the path of those Azure specific tools is:

C:\Program Files\Microsoft SDKs\Windows Azure\.NET SDK\2012-06>
instead of the path mostly mentioned in tutorials or books, i.e.
C:\Program Files\Windows Azure\xxx

I hope this helps those who starts developing on Windows Azure and longing to know where the Azure specific tools are located on default Azure SDK installation.

Wednesday, July 11, 2012

XmlDocument Class ImportNode() method

The XmlDocument.ImportNode() method is probably one of the most misunderstood function in the XmlDocument class in C# (.NET). Programmers probably expects the function to import a set of nodes from one XML document instance to another instance and place the nodes inside the target XML document instance. However, that's not what happened. Reading from MSDN (http://msdn.microsoft.com/en-us/library/system.xml.xmldocument.importnode.aspx):
Importing a node creates an XmlNode object owned by the importing document, with Name and NodeType identical to the source node. The new object also has the attributes related to namespaces (Prefix, LocalName, and NamespaceURI).
After reading the statement at MSDN above, what you should be aware is the ImportNode() method doesn't place the imported set of node in the target XML document. The method merely import the set of node from the context of the source XML document to the target XML document. What I mean by context here have to do with XML namespace. You cannot just place a "rogue" set of nodes without namespace in the target XML document, you have to give a context to the set of nodes, i.e. valid XML namespace, etc. In most cases this is probably what you want to do:
                
foreach (XmlNode currentNode in facts.DocumentElement.ChildNodes)
{
    node = doc.ImportNode(facts.DocumentElement.ChildNodes.Item(i), true);
    doc.DocumentElement.AppendChild(node);
    i++;
}

The code above copies every single child element of the root element of the facts XmlDocument object (source) to the doc XmlDocument (destination) root element.

So, next time you deal with the ImportNode() method, remember that what it does is related to the XML document instance context.

Saturday, July 7, 2012

Caching XSD Schemas in Your .NET Application

If your .NET application deals with linked XSD files, you might find it very inefficient to re-load the linked XSDs every time the application starts. One of the real world example of this is the XBRL taxonomy schemas, which is linked to numerous XSDs defining different parts of the XBRL standard. Now, how do you cache the XSDs schemas locally? For the caching to work, you need to use .NET 4.0 because the caching-related classes is only available in .NET 4.0. Now, let me show you how I make the caching works in Gepsio (one of the open source XBRL implementation):

  1. Goto the project (JeffFerguson.Gepsio project) and change the "Target Framework" to ".NET Framework 4".
  2. Add the following code to XbrlSchema.cs file: 
  3. using System.Net.Cache; // This line added for caching support
    
    //...
    
    public class XbrlSchema
        {
    //...
    private XmlUrlResolver thisXmlUrlResolver;
    
    //...
     internal XbrlSchema(XbrlFragment ContainingXbrlFragment, 
                         string SchemaFilename, string BaseDirectory)
         {
             thisContainingXbrlFragment = ContainingXbrlFragment;
             this.Path = GetFullSchemaPath(SchemaFilename, BaseDirectory);
    
             try
      {
        var schemaReader = XmlTextReader.Create(this.Path);
        thisXmlSchema = XmlSchema.Read(schemaReader, null);
        thisXmlSchemaSet = new XmlSchemaSet();
    
    ///---- START caching with XmlUrlResolver
               thisXmlUrlResolver = new XmlUrlResolver();
               thisXmlUrlResolver.CachePolicy = new  
                         RequestCachePolicy(RequestCacheLevel.CacheIfAvailable);
               thisXmlSchemaSet.XmlResolver = thisXmlUrlResolver;
    ///----- END caching with XmlUrlResolver 
    
               thisXmlSchemaSet.Add(thisXmlSchema); 
        thisXmlSchemaSet.Compile();
    
    //...
    
Well, actually I found the call to the XmlSchemaSet object (thisXmlSchemaSet) to be particularly the biggest bottleneck with Visual Studio profiler when dealing with lots of XBRL instance files because XmlSchemaSet always download the XSD dependencies from xbrl.org.

A side note: the CachePolicy member of the XmlUrlResolver class is not available in .NET Framework version < 4.0 . That's the reason why you have to switch the project to .NET Framework 4.0.

Perhaps, you're not aware of this: the call to XmlSchemaSet.Add() will traverse every linked XSD schemas   until all of them are resolved. Now, if the location of the schemas are remote, that incurs very high penalty to the speed of your application and that wastes unnecessary bandwidth. In this case, schema caching comes to the rescue.