If you intend to use you Raspberry Pi with lot's of power hungry USB device(s), such as USB-HDD, then be prepared to buy a powered USB Hub because the Raspberry Pi USB ports only deliver 100mA each (at most).
I bought one today which is not exactly mentioned over at the Raspberry Pi peripheral compatibility list (powered USB hub section). However, once I used the hub, I checked the USB device id with lsusb. It turns out the device id is in there: 1A40:0201 which translates to Terminus Technology Inc. FE 2.1 7-port Hub. The hub itself named Mumuksu (product code: MU109) and contains 13 USB ports. The cost is around $17. It comes with a power adapter (US-type connector unfortunately, so I needed a converter coz in my country the plug is European type). The power adapter output is rated at 5V and 3A.
The USB hub is powerful enough to power USB HDD and "back-power-ing" the Raspberry Pi without problem. I have yet to add another power hungry device to the mix. But again, this shows that one of the indicator of a good USB hub for raspberry pi is the huge amount of current that it provides.
Sunday, December 30, 2012
Friday, December 28, 2012
Raspberry Pi LXDE (X Server) Auto Login
I'm using Raspbian Wheezy at the moment and it's very easy to make the Raspberry Pi to do auto login to the LXDE (X server), just run raspi-config and select boot_behaviour, then select boot directly to desktop. This should run LXDE under user pi.
All is great with that, but I'm curious to know what exactly the raspi-config script do to accomplish that. Well, time to fire up grep and do some digging. I found several remnants left by raspi-config while executing this command:
All is great with that, but I'm curious to know what exactly the raspi-config script do to accomplish that. Well, time to fire up grep and do some digging. I found several remnants left by raspi-config while executing this command:
pi@raspberrypi ~ $ sudo grep -r -w 'pi' /etc/ | lessThere is an intriguing result while scrolling through less output like these:
...
/etc/lightdm/lightdm.conf:autologin-user=pi
...
/etc/passwd:pi:x:1000:1000:,,,:/home/pi:/bin/bash
/etc/passwd-:pi:x:1000:1000:,,,:/home/pi:/bin/bash
I have yet to decipher the whole stuff, but searching for the remnants of the intriguing raspi-config changes is certainly worthwile.
Thursday, December 27, 2012
Calling Python Module from C
This is a sample function (modified from python docs) to call python function in a python module from C language:
It's the job of the python function to convert to the right type as needed. For example, if you pass float value as string then you have to convert the float string to float in your python code. Let's see how to do this. Take a look at the python function as follows:
/** \brief This function executes python module passed in args[0]
 *
 * \param argCount number of arguments passed to this function in args parameter
 * \param args array of string containing the parameters. The first parameter is
 *     the name of the python module, the second parameter is the
 *     function name in the python module. The third and latter parameters
 *     are the parameters to the python function in the python module.
 */
int
exec_python_module(int argCount, char *args[])
{
    PyObject *pName, *pModule, *pDict, *pFunc;
    PyObject *pArgs, *pValue, *pFloatValue;
    int i;

    if (argCount < 2) {
        fprintf(stderr,"exec_python_module() usage: pythonfile funcname [args]\n");
        return 1;
    }

    Py_Initialize();
    pName = PyString_FromString(args[0]);
    /* Error checking of pName left out */

    pModule = PyImport_Import(pName);
    Py_DECREF(pName);

    if (pModule != NULL) {
        pFunc = PyObject_GetAttrString(pModule, args[1]);
        /* pFunc is a new reference */

        if (pFunc && PyCallable_Check(pFunc)) {
   /* NOTE: The function parameters start at
      args[2], that's why the index must be
      subtracted with two below */
            pArgs = PyTuple_New(argCount - 2);
            for (i = 0; i < argCount - 2; ++i) {
                pValue = PyString_FromString(args[i + 2]);

                if (!pValue) {
                    Py_DECREF(pArgs);
                    Py_DECREF(pModule);
                    fprintf(stderr, "Cannot convert argument\n");
                    return 1;
                }
                /* pValue reference stolen here: */
  PyTuple_SetItem(pArgs, i, pValue);
            }
            pValue = PyObject_CallObject(pFunc, pArgs);
            Py_DECREF(pArgs);
            if (pValue != NULL) {
                printf("Result of call: %ld\n", PyInt_AsLong(pValue));
                Py_DECREF(pValue);
            }
            else {
                Py_DECREF(pFunc);
                Py_DECREF(pModule);
                PyErr_Print();
                fprintf(stderr,"Call failed\n");
                return 1;
            }
        }
        else {
            if (PyErr_Occurred())
                PyErr_Print();
            fprintf(stderr, "Cannot find function \"%s\"\n", args[1]);
        }
        Py_XDECREF(pFunc);
        Py_DECREF(pModule);
    }
    else {
        PyErr_Print();
        fprintf(stderr, "Failed to load \"%s\" module\n", args[0]);
        return 1;
    }
    Py_Finalize();
    return 0;
}
The main difference to the sample code in python 2.7.3 docs (section Embedding Python in Another Application | Pure Embedding) is that instead of PyInt_FromLong(), I'm using PyString_FromString() function. Therefore, the assumption is that all of the function arguments are passed as string, in order not to truncate anything.It's the job of the python function to convert to the right type as needed. For example, if you pass float value as string then you have to convert the float string to float in your python code. Let's see how to do this. Take a look at the python function as follows:
def My_Function(my_float_string_param):
    converted_float = float(my_float_string_param)
## Process using float here
## ...
The python code above converts the float string into float with the float() function. This is needed, otherwise the python interpreter would balk out with error message if you use my_float_string_param directly on function calls that expects a python float variable. Instead of using my_float_string_param, you should use converted_float in those function calls.
Adding New Path to PYTHONPATH
If you've made a module in python, chances are, you would like to be able to import the module into one of your python script. However, if you don't want to place your script in the "standard" python location, you have to add the path of the directory containing your module to PYTHONPATH environment variable. You can check the value of the PYTHONPATH like this:
me@mymachine ~/work $ python
Python 2.7.3rc2 (default, May  6 2012, 20:02:25)
[GCC 4.6.3] on linux2
Type "help", "copyright", "credits" or "license" for more information.
>>> import  sys
>>> sys.path
['', '/usr/lib/python2.7', '/usr/lib/python2.7/plat-linux2', '/usr/lib/python2.7/lib-tk', '/usr/lib/python2.7/lib-old', '/usr/lib/python2.7/lib-dynload', '/usr/local/lib/python2.7/dist-packages', '/usr/lib/python2.7/dist-packages', '/home/pi/work/c_to_python', '/usr/lib/pymodules/python2.7']
>>>
This link explains the alternatives to do that. I choose the easiest path, i.e. adding a *.pth file to one of the path already parsed by python. For example, adding my_path.pth to /usr/lib/python2.7/dist-packages directory, with the content of my_path.pth as follows:
/home/me/my_python_lib_dirThis of course assume that your python module is in /home/me/my_python_lib_dir. That's it, hopefully this could be useful for those wanting to place a python module in "non-standard" python path(s).
Wednesday, December 26, 2012
Moving Raspberry Pi Root Filesystem Out of SDcard
This post explains how to move / (root file system) out of Rasberry Pi SDcard in Raspbian. Maybe you're asking why would you do that? Well, because SDcard is slow and it's relatively easier to wear-out (i.e. unable to be written anymore) compared to other USB-attached storage, such as USB pen/flash drive or USB-HDD, unless you are using an industrial-grade SDcard which is expensive. For a deployment setup, using SDcard only is the way to go but for a development setup, you would want your / not in the SDcard.
Now, I'll show you how to move the / partition to a USB flash drive. First, copy the contents of your present / in the SDcard to the USB flash drive with dd, I assume that the USB flash drive is recognized as /dev/sda1 by the Raspberry Pi kernel. Anyway, ordinary cp command wouldn't work because it doesn't copy the partition structure.
The second step is to change the parameters passed to the raspberry pi kernel on boot. The purpose is to change the / (root) partition from mmcblk0p2 to sda1. To do that, you have to edit /boot/cmdline.txt. You can do this step from windows because cmdline.txt is in the vfat partition in the beginning of the SDcard. This is how the parameters passed to the kernel look like after the change (I highlighted the change in italic):
Anyway, if you pay attention to the /etc/fstab entries above, you would notice that I mounted /boot in read-only mode. This is to prevent the kernel from writing into the SDcard. In a deployment scenario, it's better to make the entire SDcard mounted in read-only mode, unless you have very specific need to write into one of the SDcard partition.
Now, I'll show you how to move the / partition to a USB flash drive. First, copy the contents of your present / in the SDcard to the USB flash drive with dd, I assume that the USB flash drive is recognized as /dev/sda1 by the Raspberry Pi kernel. Anyway, ordinary cp command wouldn't work because it doesn't copy the partition structure.
pi@raspberrypi ~ $ dd if=/dev/mmcblk0p2 of=/dev/sda1 bs=512Now, get yourself some coffee and work on something else or go to sleep because this would take hours if you have enlarged your SDcard / partition to say 8GB.
The second step is to change the parameters passed to the raspberry pi kernel on boot. The purpose is to change the / (root) partition from mmcblk0p2 to sda1. To do that, you have to edit /boot/cmdline.txt. You can do this step from windows because cmdline.txt is in the vfat partition in the beginning of the SDcard. This is how the parameters passed to the kernel look like after the change (I highlighted the change in italic):
dwc_otg.lpm_enable=0 console=ttyAMA0,115200 kgdboc=ttyAMA0,115200 console=tty1 root=/dev/sda1 rootfstype=ext4 elevator=deadline rootwaitThis is not enough though, you have to change /etc/fstab in the Raspberry Pi (USB flash drive) once the system booted. Remember that you have to plug the USB flash drive after you changed the kernel boot parameter! Because raspberry pi kernel would think that the / (root filesystem) is now in /dev/sda1. This is how the modified /etc/fstab looks like:
proc            /proc           proc    defaults          0       0
/dev/mmcblk0p1  /boot           vfat    defaults,ro       0       2
#/dev/mmcblk0p2  /               ext4    defaults,noatime  0       1
/dev/sda1       /               ext4    defaults,noatime  0       1
# a swapfile is not a swap partition, so no using swapon|off from here on, use  dphys-swapfile swap[on|off]  for that
As you can see, I have commented the /dev/mmcblk0p2 root filesystem which corresponds to the second partition in the SDcard. After this change, you can reboot the system and be sure that the / will not be on the SDCard anymore.
Anyway, if you pay attention to the /etc/fstab entries above, you would notice that I mounted /boot in read-only mode. This is to prevent the kernel from writing into the SDcard. In a deployment scenario, it's better to make the entire SDcard mounted in read-only mode, unless you have very specific need to write into one of the SDcard partition.
Friday, December 21, 2012
Embedding Python Code in C - The Raspberry Pi Edition
Embedding python code, a.k.a executing python code from code written in C is explained by this notorious Linux Journal article: http://www.linuxjournal.com/article/8497. Actually, there is some explanation regarding the subject in the Extending and Embedding the Python Interpreter section of Python Documentation (mine is Python v2.7.3 documentation).
Let's put the lesson in those source to good use. The target is Raspberry Pi with Debian "Wheezy".
First up, install python-dev package to your Raspberry Pi. This will also install all required packages if they're not yet installed.
After python-dev installed. We need to find what are the GCC linker parameters that we need to use to link to the python interpreter in Raspberry Pi. In many cases this will be different from the linker parameters in your desktop (x86) distro. This is the command to know the GCC linker parameters:
Now, let's make a very simple C program that invoke the python interpreter and print "hello" to the console from inside the interpreter. This is my code that has been tested and worked:
It's not that hard, isn't it? From this point on, you can experiment with C programs that invokes python code. I have yet to find how to do this in a cross-compilation environment. For now, I have to do all the stuff in my Raspberry Pi (via ssh).
Let's put the lesson in those source to good use. The target is Raspberry Pi with Debian "Wheezy".
First up, install python-dev package to your Raspberry Pi. This will also install all required packages if they're not yet installed.
sudo apt-get install python-devWe need the python-dev package to obtain python-config, the C header files and libraries to link out C code with the python interpreter.
After python-dev installed. We need to find what are the GCC linker parameters that we need to use to link to the python interpreter in Raspberry Pi. In many cases this will be different from the linker parameters in your desktop (x86) distro. This is the command to know the GCC linker parameters:
pi@raspberrypi ~/experiments/c_to_python $ python-config  --ldflags
-L/usr/lib/python2.7/config -lpthread -ldl -lutil -lm -lpython2.7 -Xlinker -export-dynamic -Wl,-O1 -Wl,-Bsymbolic-functions
As you can see, it's pretty long. We're going to need it in our Makefile later.
Now, let's make a very simple C program that invoke the python interpreter and print "hello" to the console from inside the interpreter. This is my code that has been tested and worked:
#include < python2.7/Python.h >
#include < stdio.h >

void exec_pycode(const char* py_code);

int main(int argc, char* argv[])
{

        exec_pycode("print \"hello\"");
        return 0;
}


void exec_pycode(const char* py_code)
{
        Py_Initialize();
        PyRun_SimpleString(py_code);
        Py_Finalize();
}
As you can see, the code is very simple. You will need to use a Makefile to build the application because the linker parameter is quite tedious to input by hand. This is how my Makefile looks like:
# compile c_to_python.c

default:
        gcc -L/usr/lib/python2.7/config -lpthread -ldl -lutil -lm -lpython2.7 -Xlinker -export-dynamic -Wl,-O1 -Wl,-Bsymbolic-functions -o invoke_python c_to_python.c
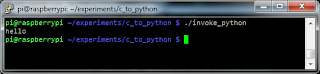
The C code in the preceding listing is in the file named c_to_python.c and the output file is named invoke_python. This is the result of the execution:
It's not that hard, isn't it? From this point on, you can experiment with C programs that invokes python code. I have yet to find how to do this in a cross-compilation environment. For now, I have to do all the stuff in my Raspberry Pi (via ssh).
Thursday, December 20, 2012
Raspberry Pi Related Datasheets and Deep Look into Very Early Boot Stage
Broadcom BCM2835 SoC (used in Raspberry Pi) datasheet is available for download at http://www.raspberrypi.org/wp-content/uploads/2012/02/BCM2835-ARM-Peripherals.pdf.
I thought that was enough to understand all there's to the Raspberry Pi from programmer's point of view with only that. It turns out, the aforementioned datasheet doesn't even said where the reset vector is. I'm new to ARM architecture, so, with a little bit of searching I found the CPU data sheet over at: http://infocenter.arm.com/help/topic/com.arm.doc.ddi0333h/DDI0333H_arm1176jzs_r0p7_trm.pdf. Well, actually there's an online version at http://infocenter.arm.com/help/index.jsp?topic=/com.arm.doc.ddi0360f/CACGDJJC.html. But, I prefer the PDF version because I don't like to waste bandwidth just to look it up again and again.
Now is the time to look deeper into it to understand the very early boot stage.
Thanks to the work of the FreeBSD guys, over at http://kernelnomicon.org/?m=201205, it get's much easier for me.
At this point, it's starting to look very similar to other embedded systems. I used to work on Realtek RTL8186 firmware and the stage to produce a working firmware is through a custom tool to "bind" all of the binaries into bootable binary. Have a look at Raspberry Pi mkimage tool over athttps://github.com/raspberrypi/tools/tree/master/mkimage. The python code in there (https://github.com/raspberrypi/tools/blob/master/mkimage/imagetool-uncompressed.py), really enlighten me how they're all put together into a working bootloader + kernel.
Tuesday, December 18, 2012
Headless PiLFS on Raspberry Pi
PiLFS (http://www.intestinate.com/pilfs/) is a LFS port for Raspberry Pi. Unfortunately for those not having HDMI or DVI displays and their associated cables, it's hard to know whether you could access your Raspberry Pi running PiLFS remotely. It's quite surprising that the static IP address is not mentioned in the link above.
This is the static IP address once PiLFS finished booting: 192.168.2.2
The SSH user is (only one): root
with password: pilfs
I tried to sweep the whole 192.168.x.x IP address back then when I still didn't have (DVI) display to find where PiLFS might configure the system's ethernet, but failed to find any. Hopefully this helps those wanting to try Raspberry Pi with barebone DIY distro and having no access to display for his/her new Raspberry Pi.
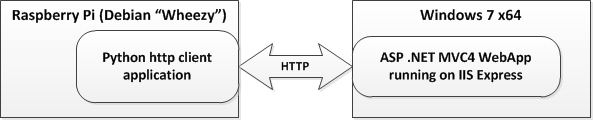
Communicating from Raspberry Pi to ASP .NET MVC 4 Application
In this post I explain how to communicate with ASP MVC 4 WebApp type of application from Raspberry Pi. The architecture of the entire solution looks like this:

Now, let me start with the application running on Raspberry Pi. This is a very simple http client application that make use of the httplib library in python. It uses HTTP GET to read value from the ASP MVC4 WebApp application. This is the code:

As you can see, the ASP MVC4 application returned the string "value" to the application in the Raspberry Pi.
Now let's move to the ASP MVC 4 application portion. The application is a default application generated when you choose to make WebApp-style application in ASP MVC 4. To do so, create a new project in Visual Studio 2010 or 2012 (I'm using Visual Studio 2010), select Visual C# | Web | ASP .NET MVC 4 Web Application then select Web API. Once your application source code is generated, everything on the server side is actually finished. What's left is configuration to make the ASP application accessible to Raspberry Pi.
There are three steps to make the application accessible through an ethernet connection to the Raspberry Pi.
The second step is quite complicated. You need to modify your current windows login account setting for IIS Express. The file is located in C:\Users\[YourLoginName]\Documents\IISExpress\config\applicationhost.config (assuming your Windows 7 user accounts data is in C:\). In the applicationhost.config, go to your application settings in the element(s) inside <site>. In my case this is how it looks like before I made changes:
To test whether your IIS Express binding is working, run your application and use your browser to access the page from the ASP MVC4 application. For example, in my case, I use http://192.168.137.1:8080 to see wheter the binding works before I tried to connect from the python application in Raspberry Pi.
The last change to make is to tell the Firewall to accept access from the Raspberry Pi. In my case I made a custom rule in the Firewall (through the firewall configuration in Control Panel) to enable all traffic from the Raspberry Pi IP address to the specific interface I used in my Windows 7 machine. The link above also explains how to manually configure Windows Firewall from Windows command line.
Now, let me start with the application running on Raspberry Pi. This is a very simple http client application that make use of the httplib library in python. It uses HTTP GET to read value from the ASP MVC4 WebApp application. This is the code:
import httplib

conn = httplib.HTTPConnection("192.168.137.1:8080")
conn.request("GET","/api/values/5")
r1 = conn.getresponse()
print r1.status, r1.reason
print r1.read()
As you can see, this application reads the value returned by the ASP MVC4 WebApp application at address http://192.168.137.1:8080/api/values/5. Before I continue explaining the ASP MVC4 portion, let's see the output of this application first when you run it and it gets response from the ASP MVC4 application:
As you can see, the ASP MVC4 application returned the string "value" to the application in the Raspberry Pi.
Now let's move to the ASP MVC 4 application portion. The application is a default application generated when you choose to make WebApp-style application in ASP MVC 4. To do so, create a new project in Visual Studio 2010 or 2012 (I'm using Visual Studio 2010), select Visual C# | Web | ASP .NET MVC 4 Web Application then select Web API. Once your application source code is generated, everything on the server side is actually finished. What's left is configuration to make the ASP application accessible to Raspberry Pi.
There are three steps to make the application accessible through an ethernet connection to the Raspberry Pi.
- Configure your application to use IIS Express.
- Change IIS Express configuration for your application to "bind" it to the ethernet interface that's connected to Raspberry Pi.
- Enable access to your Raspberry Pi through Windows 7 firewall.
The second step is quite complicated. You need to modify your current windows login account setting for IIS Express. The file is located in C:\Users\[YourLoginName]\Documents\IISExpress\config\applicationhost.config (assuming your Windows 7 user accounts data is in C:\). In the applicationhost.config, go to your application settings in the element(s) inside <site>. In my case this is how it looks like before I made changes:
<site name="MvcApplication1" id="2">
    <application path="/" applicationPool="Clr4IntegratedAppPool">
        <virtualDirectory path="/" physicalPath="D:\Experiments\WCF\MvcApplication1\MvcApplication1" />
    </application>
    <bindings>
        <binding protocol="http" bindingInformation="*:2086:localhost" />
    </bindings>
</site>
Now, to make it IIS Express listens on certain network interface, we need to specifically tell it about the binding. This is accomplished by adding new binding in the binding protocol section. This is what I added to that section:
<binding protocol="http" bindingInformation="*:8080:192.168.137.1" />This binds IIS Express to the network interface with IP address 192.168.137.1 at port 8080. The application (MvcApplication1) setting now turns into:
<site name="MvcApplication1" id="2">
    <application path="/" applicationPool="Clr4IntegratedAppPool">
        <virtualDirectory path="/" physicalPath="D:\Experiments\WCF\MvcApplication1\MvcApplication1" />
    </application>
    <bindings>
        <binding protocol="http" bindingInformation="*:2086:localhost" />
        <binding protocol="http" bindingInformation="*:8080:192.168.137.1" />
    </bindings>
</site>
Notice the change that happened in the binding protocol section. You can see similar explanation in this link: http://johan.driessen.se/posts/Accessing-an-IIS-Express-site-from-a-remote-computer.To test whether your IIS Express binding is working, run your application and use your browser to access the page from the ASP MVC4 application. For example, in my case, I use http://192.168.137.1:8080 to see wheter the binding works before I tried to connect from the python application in Raspberry Pi.
The last change to make is to tell the Firewall to accept access from the Raspberry Pi. In my case I made a custom rule in the Firewall (through the firewall configuration in Control Panel) to enable all traffic from the Raspberry Pi IP address to the specific interface I used in my Windows 7 machine. The link above also explains how to manually configure Windows Firewall from Windows command line.
Hopefully this helps ASP .NET MVC 4 folks out there who play with Raspberry Pi.
- The httplib python module exists in both python 2.7.x and 3.x
- If you want to run http server in Raspberry Pi with python you could use both python 2.7 and 3.2. Just use the SimpleHttpServer module or invoke it with "python -m SimpleHttpServer [port number to listen to]"
- Last but not least, I have changed my Raspberry Pi IP to static IP before conducting this experiment.
Monday, December 17, 2012
Cross Compiling to Raspberry Pi from Windows 7
In this post I will explain how to cross compile a "Hello World!" application from Windows 7 to Raspberry Pi. There's a catch though, I run the cross compiler in Linux Slackware 12 (x86) running inside virtual machine in Windows 7 host :P.
So, first up is prepare the Slackware 12 virtual machine in Windows 7. I used Vmware, but you could use VirtualBox as well. Once you get that running, you can now start preparing for the cross compilation. Download the cross toolchain from: https://github.com/raspberrypi/tools, then decompress it with unzip tool in the shell as follows:
pinczakko@sharingan:~/unzip sources/cross-tools-master.zip -d raspberry_pi_cross_toolswith the command above, the cross-toolchain is now at
~/raspberry_pi_cross_toolsNow, I need to export the path of the cross compilers to my local environment. The path of the cross compilers binaries is at
~/raspberry_pi_cross_tools/arm-bcm2708/gcc-linaro-arm-linux-gnueabihf-raspbian/binat this point. To add the cross compilers to the environment, I edited
~/.profileand
~/.bashrcto include the following line in the end of both files:
export PATH=$PATH:$HOME/raspberry_pi_cross_tools/arm-bcm2708/gcc-linaro-arm-linux-gnueabihf-raspbian/binAfter both of the files edited, you have to log out and the log in again to make the environment changes recognized (actually, changing only .profile suffice for our purposes in Slackware 12). Now, once you log in again, you can test whether the environment changes are in effect by invoking one of the compilers. For example:
pinczakko@sharingan:~$ arm-linux-gnueabihf-gcc -v
Using built-in specs.
COLLECT_GCC=arm-linux-gnueabihf-gcc
COLLECT_LTO_WRAPPER=/home/pinczakko/raspberry_pi_cross_tools/arm-bcm2708/gcc-linaro-arm-linux-gnueabihf-raspbian/bin/../libexec/gcc/arm-linux-gnueabihf/4.7.2/lto-wrapper
Target: arm-linux-gnueabihf
Configured with: /cbuild/slaves/oort61/crosstool-ng/builds/arm-linux-gnueabihf-raspbian-linux/.build/src/gcc-linaro-4.7-2012.08/configure --build=i686-build_pc-linux-gnu --host=i686-build_pc-linux-gnu --target=arm-linux-gnueabihf --prefix=/cbuild/slaves/oort61/crosstool-ng/builds/arm-linux-gnueabihf-raspbian-linux/install --with-sysroot=/cbuild/slaves/oort61/crosstool-ng/builds/arm-linux-gnueabihf-raspbian-linux/install/arm-linux-gnueabihf/libc --enable-languages=c,c++,fortran --disable-multilib --with-arch=armv6 --with-tune=arm1176jz-s --with-fpu=vfp --with-float=hard --with-pkgversion='crosstool-NG linaro-1.13.1+bzr2458 - Linaro GCC 2012.08' --with-bugurl=https://bugs.launchpad.net/gcc-linaro --enable-__cxa_atexit --enable-libmudflap --enable-libgomp --enable-libssp --with-gmp=/cbuild/slaves/oort61/crosstool-ng/builds/arm-linux-gnueabihf-raspbian-linux/.build/arm-linux-gnueabihf/build/static --with-mpfr=/cbuild/slaves/oort61/crosstool-ng/builds/arm-linux-gnueabihf-raspbian-linux/.build/arm-linux-gnueabihf/build/static --with-mpc=/cbuild/slaves/oort61/crosstool-ng/builds/arm-linux-gnueabihf-raspbian-linux/.build/arm-linux-gnueabihf/build/static --with-ppl=/cbuild/slaves/oort61/crosstool-ng/builds/arm-linux-gnueabihf-raspbian-linux/.build/arm-linux-gnueabihf/build/static --with-cloog=/cbuild/slaves/oort61/crosstool-ng/builds/arm-linux-gnueabihf-raspbian-linux/.build/arm-linux-gnueabihf/build/static --with-libelf=/cbuild/slaves/oort61/crosstool-ng/builds/arm-linux-gnueabihf-raspbian-linux/.build/arm-linux-gnueabihf/build/static --with-host-libstdcxx='-L/cbuild/slaves/oort61/crosstool-ng/builds/arm-linux-gnueabihf-raspbian-linux/.build/arm-linux-gnueabihf/build/static/lib -lpwl' --enable-threads=posix --disable-libstdcxx-pch --enable-linker-build-id --enable-plugin --enable-gold --with-local-prefix=/cbuild/slaves/oort61/crosstool-ng/builds/arm-linux-gnueabihf-raspbian-linux/install/arm-linux-gnueabihf/libc --enable-c99 --enable-long-long
Thread model: posix
gcc version 4.7.2 20120731 (prerelease) (crosstool-NG linaro-1.13.1+bzr2458 - Linaro GCC 2012.08)
Now I have the cross compiler added to path in the bash shell. I proceed to compile a very simple hello world C application. This is the source code of that application:
#include < stdio.h >

int main(int argc, char** argv)
{
 printf("Hello World! [cross gcc]\n");
 return 0;
}
Invoke this command to compile this source file (I named the file cross_test.c):
arm-linux-gnueabihf-gcc -o cross_test cross_test.cThis creates a binary named cross_test. I transfer the binary to the Raspberry Pi with WinSCP and proceed to run it there. This is the result (in PuTTy).

This should be the first step in cross compiling to Raspberry Pi. I know that there are some Windows cross-compilers for Raspberry Pi out there but I have yet to test them.
Thursday, December 13, 2012
Headless Raspberry Pi with Windows 7
I got my Raspberry Pi (the B version) yesterday and struggle to access it via LAN because I didn't have an SDCard w/ size > 1GB. I bought 8GB SDCard just now (costs Rp. 50.000, i.e. ~ $5), it all works without any problems, I can access the Raspberry Pi via SSH. Note that the connection is via normal (not crossed) ethernet cable to my Windows 7 Laptop.
Here's what I did:
Now, screenshot time.First, cpuinfo:

Second, the debian linux version:

Now, you could make changes to the Raspberry Pi in Windows 7 without problems. The next step would be the cross-compilation and creation of applications. Stay tuned.
So far I have tried compiling some hello world code in C and python directly on the Raspberry Pi without problems. But, for some really serious application development, using the cross-toolchain would be preferred.
Because I mostly work with Raspberry Pi as headless machine, it's quite annoying to have dynamic IP address all the time. I decided to make my Raspberry Pi use static IP. All I have to do is edit /etc/network/interfaces file, change eth0 setting to static like so:

I have also "packaged" my Raspberry Pi in a makeshift enclosure made from bricked Abocom WAP252 access point enclosure to ease working with the Pi. I felt the board is too fragile in my workspace without any sort of enclosure, also because of its size, it's quite hard to hold when you're attaching or disconnecting connectors (USB, eth, HDMI, etc.) from the board. Here's how it looks like:


Here's what I did:
- Prepare a >= 2GB sdcard and a cellphone charger with 5V and 700mA-1200mA output. I used my friend's Blackberry cellphone charger at the moment, which outputs 5V and 700mA. After further tests, a Samsung smartphone charger with 4.75V and 550mA output works just fine. Perhaps, that's because I didn't load the USB ports with anything at the moment. The sdcard I used is 8GB (V-Gen).
- Download the debian "wheezy" distro from link at http://www.raspberrypi.org/downloads. I use this version: 2012-10-28-wheezy-raspbian.zip. Once installed, this version shows this in SSH:
pi@raspberrypi ~ $ cat /proc/version
Linux version 3.2.27+ (dc4@dc4-arm-01) (gcc version 4.7.2 20120731 (prerelease) (crosstool-NG linaro-1.13.1+bzr2458 - Linaro GCC 2012.08) ) #250 PREEMPT Thu Oct 18 19:03:02 BST 2012
- Decompress the debian "wheezy" image and write it to the sdcard with Win32DiskImager available from http://sourceforge.net/projects/win32diskimager/. Becareful to make sure you used the correct sdcard drive (E:,G:, etc.), because you could delete your valuable data if you happen to use the wrong drive when running Win32DiskImager.
- Run DHCP server in your Windows 7 machine. I use DHCP Server V2.3.5, available for free at http://www.dhcpserver.de/dhcpsrv.htm. I set the IP address range of the DHCP server to 192.168.0.1-6 (subnet mask 255.255.255.248) and set the IP address of my laptop ethernet to 192.168.0.1.It turns out the DHCP server gives the Raspberry Pi the IP address of 192.168.0.2. I could ping the Pi without problems.
- If you could now ping the Raspberry Pi without problems, it's time to move to the next stage. Use an SSH client to SSH to the Pi. I used PuTTy. The default user name is: pi and the default password is: raspberry.
Now, screenshot time.First, cpuinfo:

Second, the debian linux version:

Now, you could make changes to the Raspberry Pi in Windows 7 without problems. The next step would be the cross-compilation and creation of applications. Stay tuned.
So far I have tried compiling some hello world code in C and python directly on the Raspberry Pi without problems. But, for some really serious application development, using the cross-toolchain would be preferred.
Because I mostly work with Raspberry Pi as headless machine, it's quite annoying to have dynamic IP address all the time. I decided to make my Raspberry Pi use static IP. All I have to do is edit /etc/network/interfaces file, change eth0 setting to static like so:
iface eth0 inet static
address 192.168.137.2
netmask 255.255.255.0
gateway 192.168.137.1
This hardcodes the Pi's eth0 tp 192.168.137.2. This is how it looks like from Pi's remote console (SSH):

I have also "packaged" my Raspberry Pi in a makeshift enclosure made from bricked Abocom WAP252 access point enclosure to ease working with the Pi. I felt the board is too fragile in my workspace without any sort of enclosure, also because of its size, it's quite hard to hold when you're attaching or disconnecting connectors (USB, eth, HDMI, etc.) from the board. Here's how it looks like:

Perspective view

Audio Out and Video Out Side View

SDCard and micro-USB power cord Side View

HDMI out Side View

Ethernet and USB Side View
The enclosure has not been adapted to work with the ribbon cable for the GPIO yet, but it should be easy to do.
Subscribe to:
Posts (Atom)