Monday, March 17, 2008

Distributed Compilation with distcc

This is my first encounter with real-world distributed computing experiment. I'm experimenting with this due to heavy compilation task in the last few months. I've done quite a lot of kernel compilation over the last three months and that takes up a lot of productive time. Therefore, I'm starting to experiment with distributed compilation using distcc as the "compiler driver".

Distcc itself is not a compiler, it's a distributed front-end for GCC. It's running on the client machine to provide a "pool" of machine that will take part in the compilation. I will start with the preparation step up-to my first experiment.

Preparation

1. The first thing to do, is read some tutorial over the net. I found this IBM developer works tute helpful, even if it's not up-to-date. I'll talk more about it in the upcoming section.

2. The next thing is to download the latest distcc from distcc official site.

3. Configure and install distcc. I'm using the following approach in compiling and installing the system. Note that my system is x86_64 system with AMD Turion64 1.8GHz and AMD Athlon64 X2 4000+ cpus. That's why you'll see an AMD64-centric optimization flags. These are the command to configure and install the package. Also, don't forget that I'm using SLES 10 SP1 with cooked-up kernel 2.6.24.3

export CFLAGS=" -m64 -O3 -mtune=athlon64 -funroll-loops -fexpensive-optimizations "
export CXXFLAGS=${CFLAGS}
./configure --prefix=/usr --libdir=/usr/lib64 --sysconfdir=/etc --mandir=/usr/share/man --with-gtk
make -j4
su
make install

The --with-gtk switch is used to inform the distcc sources that you want a gtk-based front-end for the distcc daemon. You'll see a screenshot later when I'm working on the compilation test.

My First distcc Run a.k.a Preliminary Test

Once distcc installed, I'm ready to run the test. First, I need to export the available clients
using the DISTCC_HOSTS environment variable in the machine where I will carry-out the compilation. In this case, it's my Turion64 laptop.

darmawan@opunaga:~/download/unpack/xine-lib-1.1.10.1> export DISTCC_HOSTS="167.205.22.189 127.0.0.1"

The order of the available distcc hosts in the command above is important because the first one will be given the task to compile the file(s) first. You have to specify the fastest machine in the "pool" in this position. That's why my desktop machine comes first in the command above.
Then, run the distccd in the "pool", i.e. my desktop machine because I only have one machine beside the machine where the compilation invoked from:

darmawan@opusera:/home/sources/unpack/distcc-2.18.3> /usr/bin/distccd --daemon --allow 167.205.22.187

This is where the difference between the IBM developer works' tute and the current state of distccd (distccd version 2.18.3). The current version requires you to specify explicitly to run the distccd server as daemon process and also the client(s) that will be allowed to use the distccd server, if you run distccd as a stand-alone server process. Note that the distccd comand above runs on my Athlon64 X2 desktop.
Now, from the client, i.e. my Turion Laptop, I'm testing the distcc by using it to compile the xine library:

darmawan@opunaga:~/download/unpack/xine-lib-1.1.10.1> CC=distcc ./configure
darmawan@opunaga:~/download/unpack/xine-lib-1.1.10.1> make -j6

During the build process, I monitor the compilation process from my laptop using distccmon-gnome. This is the screenshot.
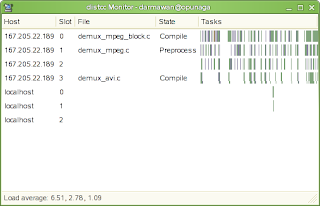

This is only preliminary test. My next target would be cross-compilation setup and other advanced distcc usage along with quantitative benchmark against single machine compilation. Stay tune :-).


Benchmarks and Fine Tuning

After several fine tuning attempts, I found that the most usable configuration is to run distcc locally in the laptop as ordinary user with the following parameters.

distccd --daemon -a 127.0.0.1 -N20 -j2

and also setting up the DISTCC_HOSTS environment variable to:

export DISTCC_HOSTS="167.205.22.189 127.0.0.1"

This way, the distccd won't disturb me working on the laptop and will squeeze every ounce of performance from the Athlon64 X2 desktop. The distccd runs on the desktop on ordinary user account with the following parameters.

distccd --daemon -a 167.205.22.187 -N0 -j6


Now, let's see how the single machine compilation compares to offloading the task to two machines. To see the difference, I'm doing a linux kernel 2.6.24.3 compilation benchmark. The following is the result.

Platform Compile Time

Turion64 laptop (single core 1.8GHz, 1GB RAM)
GCC 4.1.2 x86_64 multilib 17 min 26 sec

Distcc (GCC 4.1.2 x86_64 multilib back-end)
Turion64 laptop (single core 1.8GHz, 1GB RAM) +
Athlon64 X2 desktop (dual core 2.1GHz, 2GB RAM) 7 min 26 sec

The kernel compilation is timed with the following scripts:

#!/bin/bash
#
# This script is used to build the linux kernel and provide
# build-time information for distributed compilation
#
#

make distclean
cat /proc/config.gz > .config.gz
gzip -dv .config.gz
make silentoldconfig
date +%T > timing_info.txt
make CC="distcc gcc" -j10
date +%T >> timing_info.txt


#!/bin/bash
#
# This script is used to build the linux kernel and provide
# build-time information for single machine compilation
#
#

make distclean
cat /proc/config.gz > .config.gz
gzip -dv .config.gz
make silentoldconfig
date +%T >> timing_info.txt
make -j2
date +%T >> timing_info.txt


This is the screenshot of the distcc during the kernel compilation benchmark.
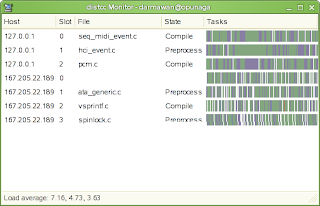

As you can see, distcc improves my productivity more than two folds due to task distribution to the much more powerful machine.


A Glimpse Over Distributed Cross-Compilation

I've tried distributed cross-compilation as well. But, not as fine-grained as the previous kernel compilation benchmark. To carry-out distributed cross compilation, what you need are:

  • The same cross-compiler in all the machine that will participate. Make sure that the path to the cross-compiler and its associated tools is placed in the system-wide PATH environment variable. You can echo ${PATH} to ensure it has been setup correctly.


  • Distcc installed in all of the machine that will participate.


To do the cross-compilation, invoke the specific cross compiler when you run make, for example, to distribute the mips cross-compilation task, you would invoke:

make CC="distcc mips-uclibc-gcc"

Or another way is to edit the corresponding Makefile(s) in the source code that going to be compiled.

In the next update of this post, I will show how to do cross compilation in more detail, with some benchmarks of course.

Sunday, March 16, 2008

SLES 10 SP1 Network interface configuration "peculiarity"

The network interface configuration files in SLES 10 SP1 is located in /etc/sysconfig/network directory. For every interface, there exist a ifcfg-XXX configuration file, where the XXX denotes the interface name as seen by the system from /sys file system. This is where the problem comes. Because I've upgraded my kernel and udev manually, the system cannot initialize the eth0 (RTL8189) interface correctly because its configuration file is written as ifcfg-eth-bus-pci-0000:05:00.0 whereas it's seen as eth0 by the system. Therefore I have to:

cp -v /etc/sysconfig/network/ifcfg-eth-bus-pci-0000:05:00.0 /etc/sysconfig/network/ifcfg-eth0

to make eth0 configuration activated upon boot. This is quite annoying because I have to look for it for about a day or so.

Tuesday, March 11, 2008

The x86_64 Experience

This post is about how to get my Turion64-based Compaq W2718 Laptop work with Suse Linux Enterprise Server (SLES) 10 SP1 x86_64. Side note: I'm trying to get OpenSuse ASAP. This is only for first run to see how the x86_64 works first hand.

My First Impressions

The SLES SP1 x64 is able to boot my system right into X11 after installation. Nonetheless, a lot of glitches remain. First, the screen is always stuck after a couple of second before the system can respond to user input again. The WLAN adapter (Broadcom BCM4318) is _not_ working. The bluetooth adapter (Broadcom 2025?) is not working. However, everything else is just fine.

Fixing Things

The first step is to update the aging Linux kernel 2.6.16-x that comes out of the box with kernel 2.6.24.3.
It's pretty easy, I just get the old optimized kernel config from my previous Slackware 12 (32-bit) and change some parameters, and then build the kernel RPM as follows:

make mrproper
make ARCH=x86_64 menuconfig
make -j4 binrpm-pkg

Upon completion, the kernel build process will show you where the resulting kernel RPM located.
Using: rpm -iv <kernel_rpm> , the kernel is installed. Unfortuntele, upgrading the kernel is not enough, because the kernel mismatch with the udev utilities which links the kernel with the user application through /dev. So, udev is upgraded to version 118 (previously version 085 with the default install). Note that the psmouse module is not loaded by default by the kernel so, it must be added to the module loaded on boot in the /etc/sysconfig editor in Yast2.

The second thing to do is installing the propietary ATI Xpress 200M display driver. This is needed because I want ultimate performance when using X11. It's pretty trivial, all you have to do is make sure the links (build and source links) in the kernel module directory points to the _real_ kernel source that you have configured and has right module version file. You can run "make modules" in the kernel source to obtain the required kernel source level. After that, driver installation is trivial.

The third thing is to get the WLAN working. This is one of those mundane task. First, I have to find a working Windows XP x64 WLAN driver because Ndiswrapper currently a bit problematic when dealing with Vista driver. I don't go the native-linux-driver way because it's not working after a few tries. It's a bit of a guess work to find the driver, but after some searching I found it at: ftp://ftp.acer-euro.com/notebook/aspire_5020/driver/xp64/Wlan Driver Ambit Broadcom Ver. 3.100.64.0.zip. I found this link upon reading: http://ndiswrapper.sourceforge.net/joomla/index.php?/component/option,com_openwiki/Itemid,33/id,list_b/
The post at Ndiswrapper is a bit misleading because Acer Europe seems to have reorganized the directories in the FTP server. So, obtain the driver and use ndiswrapper to use the driver. The approach is the same as 32-bit driver. Note that I'm using Ndiswrapper version 1.52

make uninstall
make -j2
su -
make install
ndiswrapper -i bcmwl5.inf

Then disable the native linux driver by making it a blacklisted driver. To do this,
edit /etc/modprobe.d/blacklist

# Disable the default Broadcom BCM43xx and mac80211 driver
# because we are using ndiswrapper
blacklist mac80211
blacklist ssb
blacklist b43

Then go to Yast2 /etc/sysconfig editor and change the module loaded on boot, add ndiswrapper there.
We're not done yet. The wireless tools that comes with SLES 10 SP1 cannot work with the current 2.6.24 kernel so, it has to be replaced with newer wireless tools. I'm using wireless tools version 29 and it can work correctly.
To make all of these wireless setting to work, the machine must be rebooted.

Now, the thing left unhandled is the bluetooth. I'll post about it when I'm done.

So, after one day of struggling to find the solution, I finally managed to make my bluetooth Dial-up Networking (DUN) works, even if there's still a catch. These are the steps to make it work:

1. Download the bluez sources from www.bluez.org. You need to download the mandatory bluez-libs, bluez-utils packages. I chose to download bluez-hcidump and bluez-firmware as well because my bluetooth dongle is Broadcom bcm2045 and I need the hcidump tools to debug the bluetooth connection.

2. The packages other than bluez-utils need to be configured using the following parameters:

export CFLAGS=" -m64 -O2 -mtune=athlon64 -funroll-loops -fexpensive-optimizations "
export CXXFLAGS=${CFLAGS}
./configure --prefix=/usr --libdir=/usr/lib64

It has to be like that because I'm running SLES 10 SP1 64-bit which uses multilib. In systems that uses multilib, the 64-bit libraries are placed in a different directory, e.g. /usr/lib64, /lib64, while the "old" 32-bit libraries remain in the old places, such as /lib, /usr/lib. This is of course outside of the 64-bit kernel modules which are placed in /lib/modules/`uname -r`.

3. The configuration of the bluez-utils package as follows:

export CFLAGS=" -m64 -O2 -mtune=athlon64 -funroll-loops -fexpensive-optimizations "
export CXXFLAGS=${CFLAGS}

./configure --prefix=/usr --mandir=/usr/share/man --sysconfdir=/etc \
--localstatedir=/var --libexecdir=/lib64 --disable-debug --enable-hal \
--enable-usb --disable-alsa --enable--obex --enable-glib --disable-gstreamer \
--disable-audio --enable-input --enable-serial --enable-network \
--enable-sync --enable-echo --enable-hcid --enable-sdpd --enable-hidd \
--enable-pand --enable-dund --enable-test --enable-manpages \
--enable-configfiles --enable-initscripts --enable-tools --enable-bccmd \
--enable-hid2hci --enable-dfutool --enable-dfubabel

It's a pretty complex configuration due to the quite outdated development packages in SLES 10 SP1.

4. Next up is compiling the packages. It's as easy as invoking

make -j2

in the package directory.

5. Then install the packages under root privilege with:

make install


After installing the package, then configure the configuration files as mentioned in my previous bluetooth setting post.

Once the configuration files has been adjusted, we are ready to go. What you need to do now is fire up the needed services and setup the rfcomm device as follows.

opunaga:~ # /etc/rc.d/bluetooth start
opunaga:~ # rfcomm bind rfcomm0

The bluez-utils package installs the bluetooth initialization code in /etc/rc.d/bluetooth. I'm a bit lost previously and I find this file by accident when I was reading the scripts in /etc/rc.d directory.

Then this is where the weird bluetooth authentication bug occurs. No matter how hard I try, I never managed to connect the phone directly by only invoking wvdial and then typing the bluetooth passcode in the phone. To solve this problem, I have to pair the phone first hand before invoking wvdial, otherwise it will stop with messages like "rfcomm connection refused". Therefore, pair the bluetooth connection by opening the bluetooth setting in the phone first, then you can invoke wvdial as usual. In this case, wvdial won't need authentication anymore, because the hci interface (bluetooth USB dongle) has been paired with the phone. So, just invoke:

wvdial bluetooth

There you have it. The bluetooth is working in my x86_64 system. Anyway, I noticed that the bluetooth connection in my x86_64 SLES 10 SP1 is much more robust and quicker in terms of connection setup time apart from the weird passcode authentication bug I mentioned above.

Monday, March 3, 2008

Sanitizing The Linux Kernel Headers -- Strange fact in Kernel 2.6.24.3

It's not a widely known fact that you can create a "sanitized" a.k.a ABI-stable kernel headers automatically from the kernel source yourself since Linux Kernel 2.6.18 introduced.

One can do this by cd-ing into the root directory of the kernel source and invoking
the following command:

make mrproper
make headers_check
make ARCH=<your_target_architecture> INSTALL_HDR_PATH=<your_target_header_directory> headers_install

The target architecture defaults to the architecture of the machine where you run the command. You can see all the available architecture by doing an 'ls' in the arch directory inside the root directory of the kernel source. Nonetheless, at least, there is one obscure target that is not shown there, i.e. x86_64. I know this because I'm building a sanitized kernel headers for x86_64 architecture recently. My invocation
command as follows:

make mrproper
make headers_check
make ARCH=x86_64 INSTALL_HDR_PATH=/tools/include headers_install


Now, what this have to do with the recent kernel 2.6.24.3? Apparently, the current Linux source code maintainer has made an obscure mistake, but it's not his fault entirely. This mistake causes the "make headers_check" failing because of wrong header file. It happens because a header that's meant to be for kernel 2.6.25-rcX slipped into the kernel 2.6.24.3 release. You can check it in the following link:
http://marc.info/?l=linux-kernel&m=120405715327409&w=2
The following is the "naked" message from the current kernel maintainer:

----------------------------------------------------------
List: linux-kernel
Subject: Re: [stable] Linux 2.6.24.3 (if_addrlabel.h HEADERS_CHECK failure)
From: Greg KH
Date: 2008-02-26 20:01:37
Message-ID: 20080226200137.GB10249 () kroah ! com
[Download message RAW]

On Tue, Feb 26, 2008 at 07:29:43AM -0800, Stephen Hemminger wrote:
> On Tue, 26 Feb 2008 14:38:47 +0000
> Daniel Drake wrote:
>
> > Randy Dunlap wrote:
> > > > We (the -stable team) are announcing the release of the 2.6.24.3
> > > > kernel.
> > >
> > > When HEADERS_CHECK=y:
> > >
> > > make[3]: *** No rule to make target \
> > > `/local/linsrc/linux-2.6.24.3/include/linux/if_addrlabel.h', needed by \
> > > `/local/linsrc/linux-2.6.24.3/usr/include/linux/if_addrlabel.h'. Stop. \
> > > make[2]: *** [linux] Error 2
> >
> > This appears to have been caused by the patch titled:
> >
> > NET: Add if_addrlabel.h to sanitized headers.
> >
> > The patch only adds the unifdef-y entry for this header file, however
> > that header was only added after 2.6.24.
> >
> > It seems that this patch was submitted to -stable in error. Stephen, can
> > you confirm?
>
> The patch was meant for 2.6.25 only.

So should it be reverted? David sent it to me for some reason :)

thanks,

greg k-h
----------------------------------------------------------


So, how did I find it? I found that mistake when I build my sanitized x86_64 kernel headers a few days ago. I stumbled upon error in the "make headers_check" step. Therefore, I choose to use kernel 2.6.24.2 header to make the sanitized x86_64 kernel headers and it works just fine.


Note: ABI = Application Binary Interface